banner


How Much To Repair A Lg V20 Screen

  • Press the button on the lower right side of the LG V20 to open the clamp that holds the back cover on the back side of the phone. Remove the back cover. Remove the back cover.

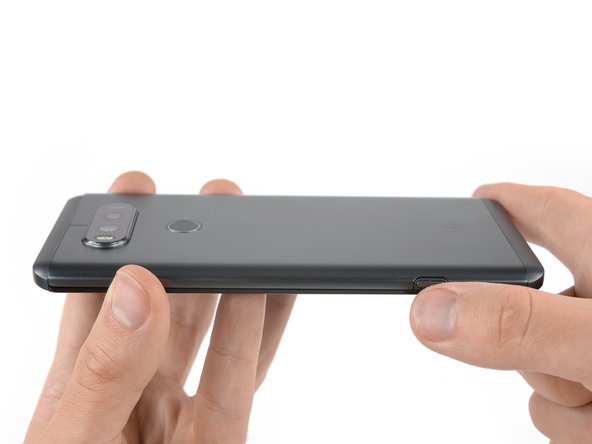
    • Press the button on the lower right side of the LG V20 to open up the clamp that holds the back cover on the back side of the phone.

    • Remove the back comprehend.

  • Before disassembling your phone, discharge the battery below 25%. A charged lithium-ion battery can catch fire and/or explode if accidentally punctured. Insert a spudger or your fingernail under the battery at the small recess on the lower edge. Be careful not to deform or puncture the battery.

    • Earlier disassembling your phone, discharge the battery below 25%. A charged lithium-ion battery tin catch burn down and/or explode if accidentally punctured.

    • Insert a spudger or your fingernail under the battery at the small recess on the lower edge.

    • Be conscientious not to deform or puncture the bombardment.

    • Pry upward and remove the battery.

  • Remove the sixteen 4mm Phillips #00 screws attaching the back cover to the motherboard.

    • Remove the xvi 4mm Phillips #00 screws attaching the dorsum cover to the motherboard.

  • The top and bottom frame section   hold very tight to the mid frame. It is possible to pull them off with your hands. If you're not able to do so, use the following removal procedure: Use the flat end of a spudger and apply pressure to one of the corners of the frame section until you create a small gap.

    • The tiptop and lesser frame section hold very tight to the mid frame. It is possible to pull them off with your hands. If you're not able to do so, apply the following removal procedure:

    • Use the flat end of a spudger and utilize pressure to 1 of the corners of the frame section until you lot create a small gap.

  • Flip the phone and insert an opening pick in the gap you created. Slide the opening pick along the gap until the frame section pops out of its plastic clamps.

    • Flip the phone and insert an opening pick in the gap you created.

    • Slide the opening pick along the gap until the frame section pops out of its plastic clamps.

  • Remove the frame section.

    • Remove the frame section.

    • Repeat this procedure with the frame section on the other end of the phone.

    • Inside the top frame section there'south a small silver grating that covers the speaker. This may fall out, then be careful non to lose it.

  • The loudspeaker is attached to the cover of the motherboard. Use an opening pick to pry it up. The loudspeaker is attached to the cover of the motherboard. Use an opening pick to pry it up.

    • The loudspeaker is attached to the cover of the motherboard. Apply an opening pick to pry it up.

  • The cover of the motherboard is held in its place by several plastic clamps. Use an opening pick to pry up the motherboard cover at the right corner at the bottom of your phone until it pops out of the plastic clamp.

    • The comprehend of the motherboard is held in its place by several plastic clamps.

    • Use an opening choice to pry upward the motherboard cover at the right corner at the bottom of your phone until information technology pops out of the plastic clamp.

  • Slide the opening pick along the mid frame and flip it sideways to open the plastic clamps holding the motherboard cover in its place. Slide the opening pick along the mid frame and flip it sideways to open the plastic clamps holding the motherboard cover in its place.

    • Slide the opening pick along the mid frame and flip it sideways to open the plastic clamps property the motherboard cover in its place.

  • Remove the motherboard cover.

    • Remove the motherboard cover.

  • Use the flat end of a spudger to disconnect the front camera flex cable. If you want to go on and remove the motherboard assembly, there is no need to remove the front facing  camera after disconnecting it. However if you feel uncertain, carefully remove it with a pair of tweezers.

    • Use the flat end of a spudger to disconnect the front end camera flex cablevision.

    • If you want to proceed and remove the motherboard assembly, there is no need to remove the front facing camera after disconnecting it. However if you feel uncertain, carefully remove information technology with a pair of tweezers.

    • Use a pair of tweezers to advisedly remove the front facing camera. Exist careful to just grip the trunk of the camera, as the superlative is the sensor pcb and is only held on with gum (removal will ruin the sensor).

  • Use the flat end of a spudger to disconnect the flex cable of the left rear camera.

    • Use the flat end of a spudger to disconnect the flex cable of the left rear camera.

    • The second rear camera will come up out with the motherboard since it is connected on the other side.

    • Y'all can leave the front facing camera in its place as long as you're careful while removing the motherboard assembly. However if you feel uncertain, carefully remove it with a pair of tweezers.

  • Disconnect the display flex cable with the flat end of a spudger.

    • Disconnect the display flex cable with the flat end of a spudger.

  • Use the pointed end of a spudger to lift up the motherboard assembly until you can get a good grip. Carefully lift up the motherboard assembly and remove it.

    • Use the pointed end of a spudger to lift up the motherboard assembly until y'all can get a good grip.

    • Advisedly elevator upwards the motherboard assembly and remove it.

  • Use a pair of tweezers to gently peel off the cable of the secondary screen at the top of your phone. Use a pair of tweezers to gently peel off the cable of the secondary screen at the top of your phone.

    • Utilize a pair of tweezers to gently pare off the cable of the secondary screen at the superlative of your phone.

  • Use an iOpener to loosen the adhesive on all sides of the display.

    • Employ an iOpener to loosen the adhesive on all sides of the display.

    • If your display glass is croaky, keep further breakage contained and prevent bodily harm during your repair by taping over the glass.

    • Lay overlapping strips of articulate packing tape over the phone'due south display until the whole face is covered.

    • This will continue glass shards contained and provide structural integrity when prying and lifting the brandish.

    • Wear safety glasses to protect your eyes from any glass shaken gratuitous during the repair.

  • If the broken glass makes it difficult to get a suction cup to stick in the next few steps, try folding a strong piece of tape (such as duct tape) into a handle and lifting the display with that. Use a suction cup to lift the upper end of the display until you can insert the tip of an opening pick. Only insert the tip of the opening to not damage any components beneath the display.

    • If the broken drinking glass makes it difficult to go a suction cup to stick in the side by side few steps, try folding a strong piece of tape (such every bit duct tape) into a handle and lifting the display with that.

    • Use a suction cup to lift the upper end of the display until you tin insert the tip of an opening pick.

    • Only insert the tip of the opening to not damage any components beneath the display.

    • Slide the opening selection around all sides of the phone to cut the agglutinative.

    • Leave an opening pick in each corner of the telephone to prevent the adhesive from resealing.

    • Don't elevator up the display directly away after you cutting the adhesive on all sides. The 2 brandish cables are yet threaded through the mid frame of the telephone.

  • Gently thread the main display cable through the gap in the mid frame at the bottom end of your phone. Only lift the lower part of the display to do so. Gently thread the second display cable through the gap in the mid frame at the top of your phone.

    • Gently thread the main display cable through the gap in the mid frame at the bottom finish of your phone. Only lift the lower part of the display to do so.

    • Gently thread the 2d display cablevision through the gap in the mid frame at the top of your phone.

  • Remove the display.

    • Remove the display.

    • Remove any remaining adhesive from the telephone, and clean the glued areas with isopropyl booze and a lint-free cloth.

  • Source: https://www.ifixit.com/Guide/LG+V20+Display+Replacement/113650

    Posted by: olivericommoodle1992.blogspot.com

    0 Response to "How Much To Repair A Lg V20 Screen"

    Post a Comment

    Iklan Atas Artikel

    Iklan Tengah Artikel 1

    Iklan Tengah Artikel 2

    Iklan Bawah Artikel